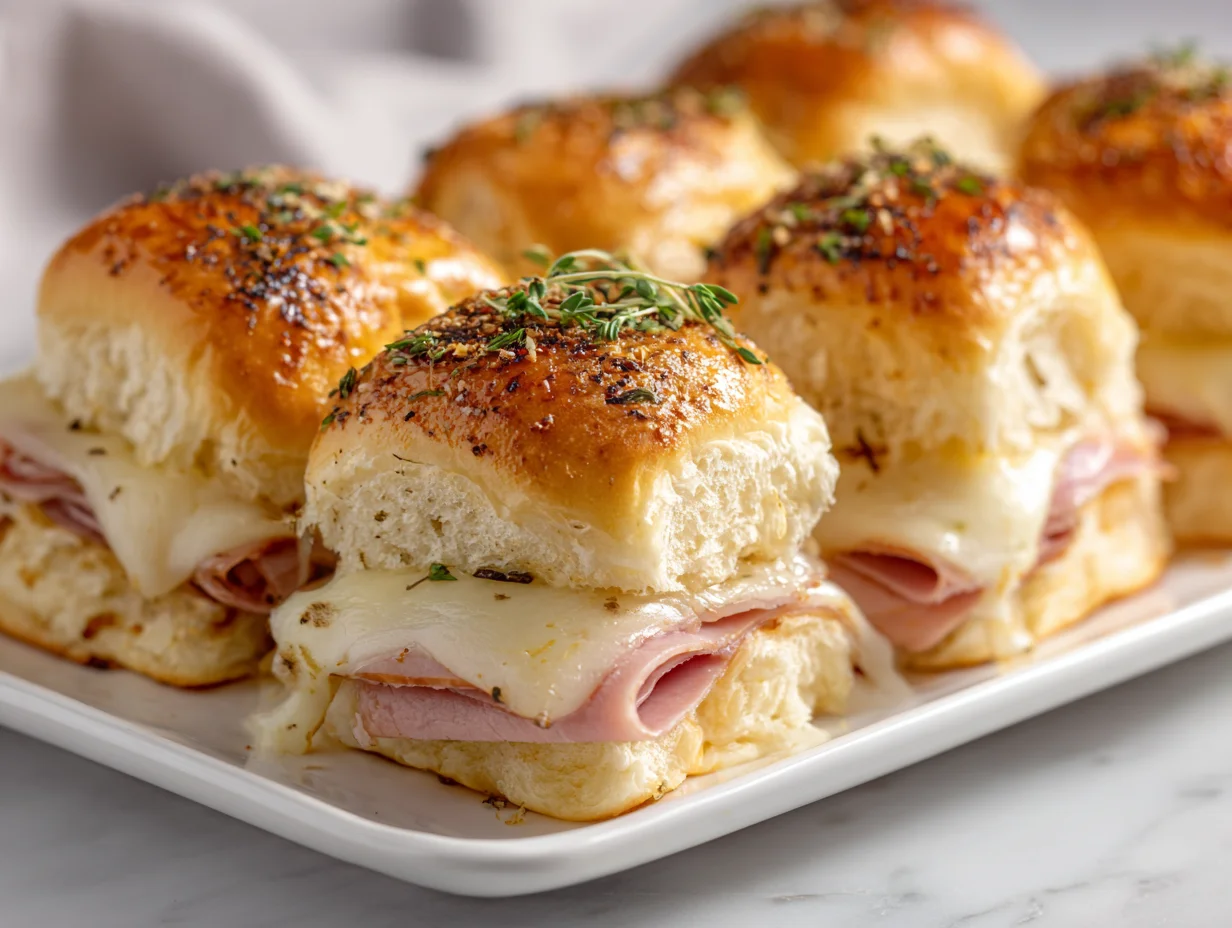
Cheesy Garlic Parmesan Cheeseburger Bombs Recipe

The perfect comfort food doesn’t just satisfy hunger it creates a moment. These Cheesy Garlic Parmesan Cheeseburger Bombs deliver exactly that. Imagine juicy seasoned beef, melted cheese, and rich garlic butter, all wrapped in golden, fluffy dough. Each bite is packed with bold flavor and irresistible texture, making it a standout dish for both casual meals and special gatherings.
As a professional chef, I value recipes that combine simplicity with impact. This one excels by layering flavors thoughtfully: savory beef, creamy cheese, and aromatic garlic parmesan coating. The result is a balanced, indulgent bite that feels both familiar and elevated, appealing to a wide range of tastes.
Whether you’re hosting guests or craving a gourmet-style snack, these cheeseburger bombs offer versatility and crowd appeal. With the right technique and attention to detail, you can achieve restaurant-quality results in your own kitchen without unnecessary complexity.
👉 If you love loaded beef and cheese, try our Loaded Ground Beef Philly Cheesesteaks.
The Overlooked Errors That Affect Flavor Balance
One common mistake in this recipe is under-seasoning the beef. Many cooks rely solely on salt and pepper, which leads to a flat, uninspiring filling. Without proper seasoning layers, the final result lacks the depth expected from a cheeseburger-inspired dish.
Another frequent issue is overfilling the dough. While it’s tempting to pack in more meat and cheese, doing so causes the dough to tear or leak during baking. This results in uneven cooking and loss of that signature juicy center.
Using cold dough straight from the fridge is also problematic. It becomes difficult to shape and doesn’t expand properly in the oven, leading to dense, unevenly baked bombs that lack softness.
Lastly, skipping the garlic parmesan coating step reduces the overall flavor impact. This finishing layer is essential for delivering that rich, aromatic profile that defines the recipe and elevates it beyond a basic stuffed bread.
Pro Techniques for Perfect Cheeseburger Bombs
Start by seasoning the beef properly with garlic powder, onion powder, and a touch of Worcestershire sauce. This enhances the umami profile and ensures every bite is flavorful and balanced.
Use moderate filling portions to maintain structure. Seal each dough ball tightly, ensuring no gaps. This prevents leaks and helps achieve a perfectly rounded, golden finish.
Allow the dough to rest at room temperature before shaping. This improves elasticity, making it easier to handle and resulting in a softer, fluffier texture after baking.
Finally, brush generously with garlic butter and sprinkle parmesan immediately after baking. This step locks in flavor, adds aroma, and creates a professional, bakery-style finish that makes the dish truly exceptional.
Ingredients You’ll Need
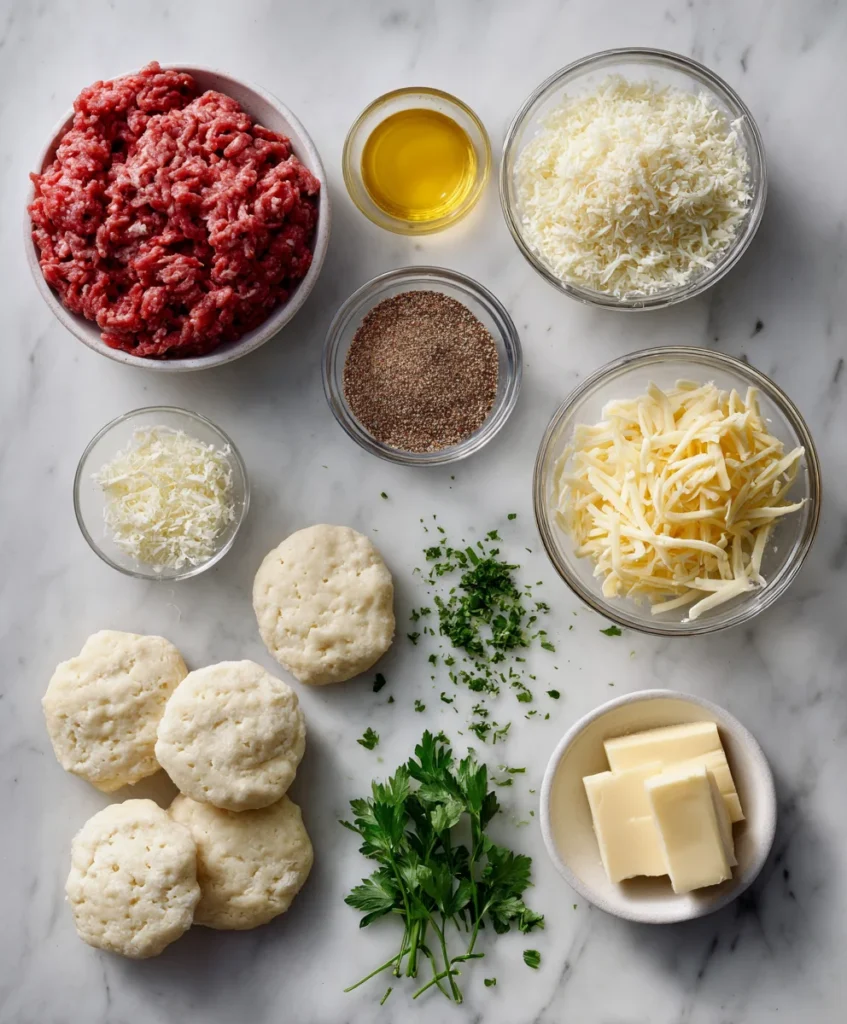
Base Ingredients:
- Ground beef
- Burger seasoning
- Refrigerated biscuit dough or pizza dough
- Cheddar cheese cubes
- Mozzarella cheese
- Butter (melted)
- Garlic (minced)
- Parmesan cheese
Optional Add-ins:
- Jalapeños
- Caramelized onions
- Pickles
- Mustard or ketchup filling
- Fresh parsley
Step-by-Step Instructions
Prepare the Filling
Start by cooking ground beef in a skillet over medium heat, breaking it apart evenly. Add seasoning, garlic powder, and a splash of Worcestershire sauce for depth. Cook until browned and slightly caramelized, then remove excess grease. Let the mixture cool slightly before assembling to prevent melting the dough prematurely. This ensures a balanced, flavorful filling that holds its texture and doesn’t make the dough soggy during baking.
Shape the Dough
Take each portion of dough and flatten it gently into a round disc. Avoid making it too thin, as this can cause tearing. Place a spoonful of beef mixture and a cube of cheese in the center. Carefully fold the edges over and seal tightly, ensuring no gaps. Roll gently into a smooth ball shape. Proper sealing is crucial to keep the filling intact and achieve a clean, professional presentation.
👉 For another cheesy, indulgent option, check out Cheesy Garlic Butter Bacon Cheeseburger Rollups.
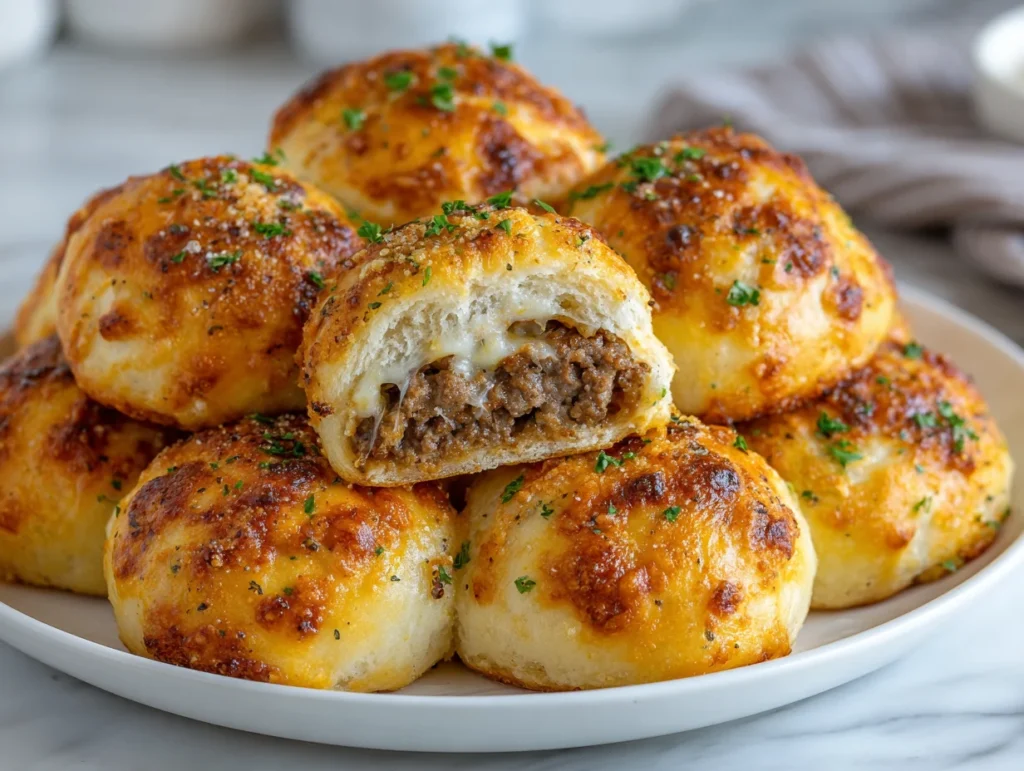
Bake to Perfection
Arrange the sealed dough balls seam-side down on a lined baking tray. Bake in a preheated oven at the recommended temperature until golden brown. Keep spacing consistent to allow even heat circulation. Avoid overbaking, as this can dry out the filling. The goal is a soft interior with a lightly crisp exterior, creating a perfect contrast in texture that enhances the overall eating experience.
Finish with Garlic Parmesan
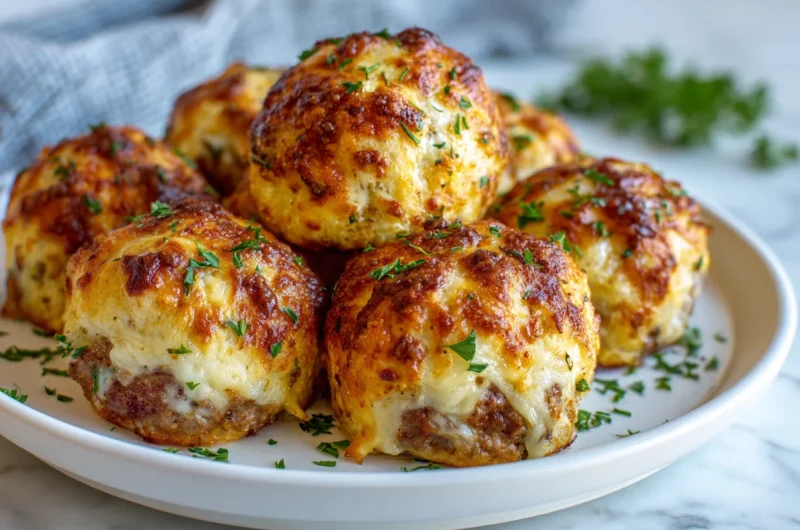
Immediately after removing from the oven, brush each bomb with melted garlic butter. Sprinkle freshly grated parmesan and chopped parsley on top. This step adds aroma, richness, and a visually appealing finish. Serve warm for the best experience, allowing the cheese inside to remain melted and gooey while the outer layer stays soft yet slightly crisp.
Cook Time
Total: 45 minutes
Prep: 20 minutes
Bake: 25 minutes
Servings
This recipe yields approximately 10 to 12 cheeseburger bombs, making it ideal for family meals or small gatherings. Each piece is portioned to deliver a satisfying bite without being overwhelming.
The compact size makes them perfect for serving as appetizers or snacks. They are easy to handle, visually appealing, and convenient for sharing, especially during events or casual dining setups.
Their richness ensures that even a few servings are filling, making them both economical and indulgent. This balance makes the recipe highly practical for both everyday cooking and entertaining.
Makes approximately 10–12 servings
Nutritional Information (approx. per serving)
- Calories: 320 kcal
- Protein: 14g
- Carbohydrates: 22g
- Fat: 20g
- Sodium: Moderate
These cheeseburger bombs provide a good source of protein, supporting muscle maintenance and energy levels. The combination of fats and carbohydrates offers a balanced energy release.
The cheese contributes calcium, which supports bone health, while the beef adds essential nutrients like iron and vitamin B12.
When enjoyed in moderation, this recipe can be part of a balanced diet, offering both indulgence and nutritional value in a controlled portion.
👉 For a hearty casserole with beef and potatoes, see Cheesy Ground Beef & Potato Casserole.
Storage Instructions
Store leftover cheeseburger bombs in an airtight container in the refrigerator to maintain freshness and prevent them from drying out. Proper storage helps preserve both flavor and texture.
Reheat in an oven rather than a microwave for best results. This restores the outer crispness while keeping the inside warm and soft.
For longer storage, freeze the baked bombs individually. This prevents sticking and allows easy portion control when reheating later.
Thaw in the refrigerator before reheating to maintain texture quality. Avoid reheating directly from frozen, as it can lead to uneven heating and dryness.
Suggestions
Serve these bombs with dipping sauces like garlic aioli or spicy mayo to enhance flavor variety. This adds an extra layer of indulgence and customization.
Pair with a fresh salad or coleslaw to balance the richness of the dish. The contrast improves overall meal satisfaction.
Experiment with different cheeses like pepper jack or gouda for unique flavor twists. This keeps the recipe versatile and exciting.
For presentation, garnish with fresh herbs and serve on a wooden board. This creates a visually appealing, restaurant-style serving experience.
Seasonal Relevance
These cheeseburger bombs are perfect for winter gatherings when warm, hearty foods are most appreciated. Their rich flavors provide comfort during colder months.
In summer, they work well as party snacks or barbecue side dishes, offering a unique twist on traditional burgers.
During festive seasons, they serve as convenient finger food, making them ideal for entertaining guests without complex preparation.
Their versatility ensures they remain relevant year-round, adapting easily to different occasions and seasonal preferences.
Finl Words
Great recipes are defined by balance, technique, and attention to detail. These cheeseburger bombs bring all three together in a simple yet refined way.
By focusing on proper seasoning, dough handling, and finishing touches, you can elevate this dish beyond standard home cooking.
This recipe is designed to deliver consistent, high-quality results, making it a reliable addition to your culinary repertoire.
With practice, you’ll master the technique and create a dish that impresses both visually and in flavor, every single time.
👉 For a fun twist on a cheeseburger in a quesadilla style, explore Cheeseburger Quesadilla.
Cheesy Garlic Parmesan Cheeseburger Bombs Recipe
10
servings20
minutes25
minutes320
kcalJuicy, cheesy garlic parmesan cheeseburger bombs filled with seasoned beef and melted cheese, wrapped in soft dough, and baked to golden perfection. A flavorful, crowd-pleasing snack perfect for parties, game nights, or quick comfort food cravings.
👉 If you enjoy cheesy stuffed bread treats, try Cheesy Philly Cheesesteak Stuffed Breadsticks.
Ingredients
Ground beef
Burger seasoning
Refrigerated biscuit dough or pizza dough
Cheddar cheese cubes
Mozzarella cheese
Butter (melted)
Garlic (minced)
Parmesan cheese
Fresh parsley (optional)
Directions
- Cook ground beef with seasoning until browned, then let it cool slightly.
- Flatten dough pieces, add beef and cheese, then seal into balls.
- Place on baking tray and bake until golden brown and cooked through.
- Brush with garlic butter and top with parmesan and parsley before serving.
Recipe Video
Notes
- Do not overfill to prevent leaking.
- Seal edges tightly for best results.
- Use room temperature dough for easy handling.
- Serve warm for best flavor and texture.
Frequently Asked Questions
Can I prepare cheeseburger bombs ahead of time?
Yes, you can assemble them a few hours in advance and store them in the refrigerator before baking. This helps save time when serving guests. Just ensure they are covered well to prevent drying, and bring them slightly to room temperature before baking for even cooking.
What dough works best for this recipe?
Refrigerated biscuit dough is the most convenient and gives a soft, fluffy texture. However, pizza dough is also a great option if you prefer a slightly chewier bite. Both work well as long as they are easy to handle and seal properly.
How do I keep the cheese from leaking out?
Ensure the dough is sealed tightly around the filling with no gaps or thin spots. Avoid overfilling and always place the seam side down while baking. Proper sealing and moderate filling are key to keeping the cheese inside and maintaining shape.